Key Points
- Although straight blades are often preferred in children younger than 2 years old, there is no statistical difference in intubation success rates between curved and straight blades.
- Cuffed endotracheal tubes (ETT) are generally preferred over uncuffed ETT in the operating room, although there are no differences in postoperative outcomes.
- A Cormack-Lehane grade of 2B or higher are associated with a significantly higher risk of difficult intubation.
Introduction
- Direct laryngoscopy (DL) involves visualizing the glottic opening directly by using a laryngoscope to facilitate endotracheal intubation.
- Before the 1940s, tracheal intubation was rarely performed in children.1 In the mid-1940s, the adult Macintosh and Miller blades were adapted for use in children. Since then, several pediatric laryngoscopes have been developed with modifications and improvements.
Preparation
- Prior to performing DL in children, the following equipment should be available.2,3
- Standard American Society of Anesthesiologists monitors
- Oxygen source and ventilation bag or anesthesia circuit
- Age-appropriate face mask and oropharyngeal airway
- Age-appropriate ETT and one-size smaller
- Appropriately sized laryngoscope blades
- Foam donut or equivalent for positioning
- Empty syringe to inflate the ETT cuff
- Malleable stylet that fits the ETTs
- Functioning Yankauer suction
- Tape to secure the ETT
- Induction agent
- Stethoscope
Patient Positioning4
- The optimal position for direct laryngoscopy changes with age. Prior to direct laryngoscopy, ensure the following (Figure 1) actions:5
- The glabella should be aligned horizontally with the chin.
- The anterior neck space should be opened.
- The external auditory meatus should be aligned horizontally with the suprasternal notch
- In children older than 6 years, as well as adults, the classic “sniffing position” is best.
- This involves displacement of the cervical spine anteriorly, often accomplished with a pillow or folded blanket beneath the occiput of the head to elevate it. This is followed by extension of the head at the atlantooccipital joint.
- This position aligns the oral, pharyngeal, and tracheal axes, which optimizes direct visualization of laryngeal structures.

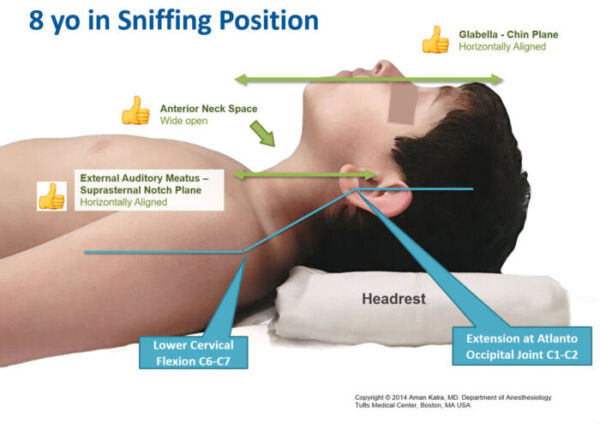
Figure 1. Sniffing position for direct laryngoscopy in an older child. Used with permission from Kalra A. Positioning infants and children for airway management. Pediatric Anesthesia Digital Handbook. Link.
- In infants and small children, it is unnecessary to elevate the head.
- This is due to the occiput being large in proportion to the patient’s body. Excessive displacement of the occiput decreases exposure of the glottic opening.
- Head extension at the atlantooccipital joint alone usually aligns the airway axes properly. (Figure 2a). Sometimes, a rolled towel placed under the shoulders and a headrest are necessary for achieving the correct alignment (Figure 2b).
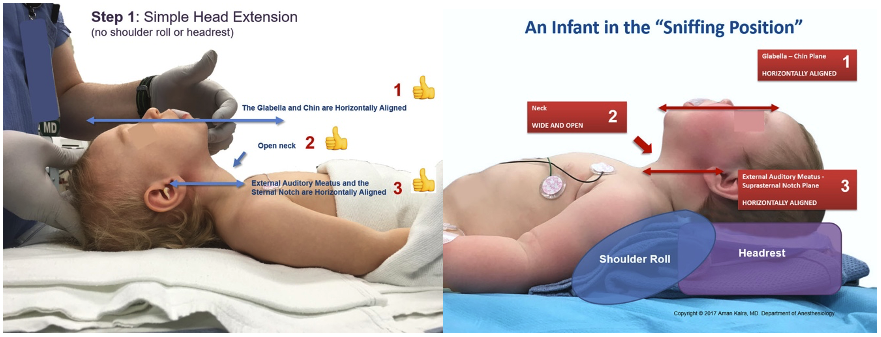
Figures 2a and 2b. Optimal positioning for direct laryngoscopy in infants and small children. Used with permission from Kalra A. Positioning infants and children for airway management. Pediatric Anesthesia Digital Handbook. Link.
Laryngoscope Blades
- A laryngoscope is composed of a handle and a blade that contains a light source.2,3 The blade itself consists of three components:
- spatula, which is in direct contact with the tongue;
- flange, which is used to direct or displace the tongue; and
- tip, which can either be placed in the vallecula and lift the epiglottis indirectly, or directly lift the epiglottis itself.
Blade Types
The two broad categories of laryngoscope blades are curved and straight blades.2,3
- Curved blades have a curved flange, which facilitates tongue displacement and allows easy placement in the vallecula (Figure 3). Examples include:
- Macintosh: most commonly used curved blade. Blade attaches to handle at 90 degrees.
- Kessel: similar to Macintosh except that the blade attaches to the handle at 110 degrees. It is useful for obese patients.
- McCoy: curved blade with a lever that flexes a hinged tip which is used to displace epiglottis or vallecula. It is not available in pediatric sizes.
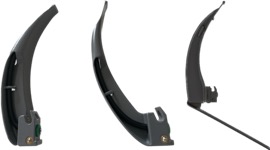
Figure 3. Curved blades displayed from left to right - Macintosh, Kessel, McCoy.
- Straight blades are often narrower, providing better visualization of the oropharynx, and employ direct lifting of the epiglottis to expose the glottic opening (Figure 4). Examples include:
- Miller: most commonly used straight blade. It has a narrow flange to improve visibility in small mouth openings and a curved tip to lift the epiglottis.
- Philips: increased tip curvature with unique light mounting illuminates downwards and inwards, often used by ENT surgeons.
- Wisconsin & Wis-Hipple: higher flange height than the Miller blades improves laryngeal visualization. The tip is straight rather than curved.
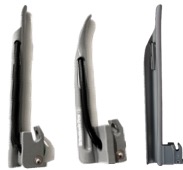
Figure 4. Straight blades displayed from left to right - Miller, Philips, Wisconsin.
- Many clinicians prefer to use a straight blade in infants and young children because a straight blade is thought to be superior in elevating the base of the tongue and visualizing the larynx than a curved blade.1,4
- Both the Miller and Macintosh blades can be used to visualize the larynx in young children if used appropriately — a Miller blade to lift the epiglottis directly, and a Macintosh blade to indirectly lift the epiglottis.4 However, if a Macintosh blade is used to directly lift the epiglottis in young children, it obscures the view.
Blade Size
- The size of the laryngoscope blade chosen depends on the patient’s age and anesthesiologist preference4 (Table 1).
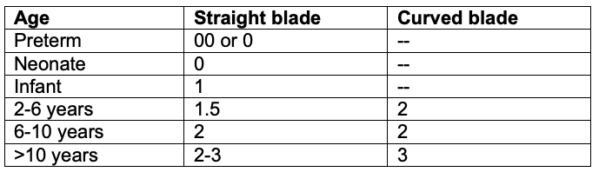
Table 1. Age-based laryngoscope blade size choices. Adapted from Fiadjoe JE, et al. Pediatric airway. In: Cote CJ, Lerman J, Anderson BJ. Eds. A Practice of Anesthesia for Infants and Children. 6th edition. Philadelphia; 2019: 297-339.
Direct Laryngoscopy Techniques
- The approach to performing DL in children is different from adults because the dimensions of the airway are smaller in children. Avoid inserting the blade deep into the esophagus and withdrawing to visualize the larynx because the blade tip can cause trauma when scraping the mucosa and arytenoids.2,4
Standard Approach2-4
- The right hand is used to scissor the mouth open, with the thumb pushing down the mandible, and the middle finger lifting the maxillary dentition (scissoring technique).
- The laryngoscope is inserted on the right side of the mouth, and the blade is used to sweep the tongue to the left side of the oral cavity.
- If a curved blade is used: upward traction in the vallecula results in indirect elevation of the epiglottis and a view of the glottic aperture.
- If a straight blade is used: tip of the blade is advanced past the epiglottis to directly lift the epiglottis upwards and expose the glottic aperture.
Paraglossal Approach2-4
- A straight blade is inserted over the lateral bicuspids/incisors at the right commissure.
- The blade is advanced downward, aiming the blade tip to the midline while sweeping the tongue to the left and exposing the glottic opening.
- This avoids damage to the maxillary central incisors.
- Effective for patients with intraoral lesions or macroglossia.
Retromolar Approach2-4
- It is a modification of the paraglossal approach.
- Patient’s head is turned to the left while the blade is inserted over the molars.
- This approach is helpful when midline structures impede laryngeal view.
External Laryngeal Manipulation4,6
- This technique refers to a provider using manual pressure on the outside of the neck, specifically at the level of the cricoid cartilage, to improve visualization of the larynx during direct laryngoscopy.
- BURP maneuver: displacement of the larynx backwards towards the cervical spine, upwards as far as possible, and laterally to the right.
- It often improves the glottic view by at least full grade. The worse the view initially is, the more likely external laryngeal manipulation will improve it.
Modified Cormack-Lehane Grading
- Cormack and Lehane initially described a four-grade scoring system in 1984 to describe the glottic view obtained DL.7 In the modified system, grade 2 (partial view of glottis) was divided into 2a (part of vocal cords visible) and 2b (only the arytenoids or the posterior part of the vocal cords are visible).8 (Figure 5)
- Grade 2B and higher laryngoscopic view are associated with a significantly higher risk of difficult intubation.
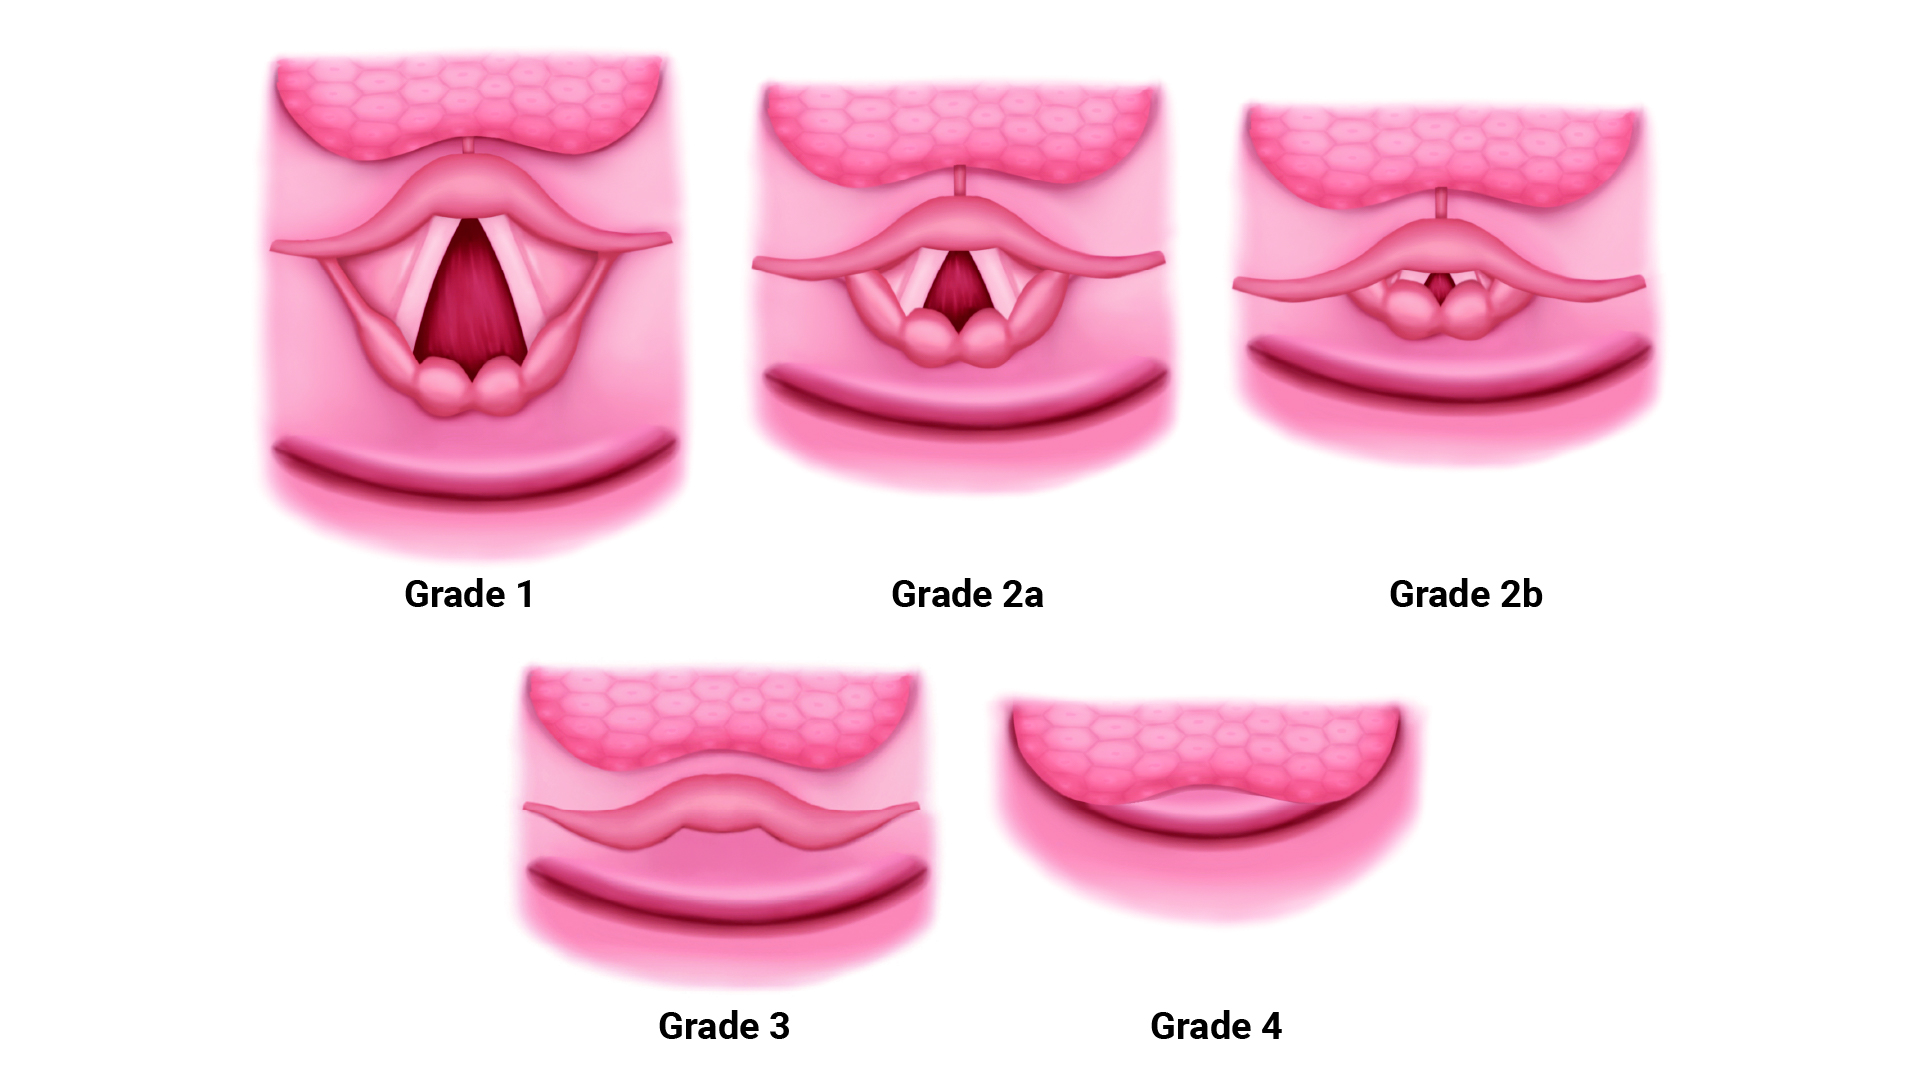
Figure 5. Modified Cormack-Lehane grading of laryngoscopic view.
Endotracheal Tubes: Cuffed vs Uncuffed
- Both uncuffed and cuffed ETTs can be used for airway management in children.
Uncuffed ETTs
- Historically, uncuffed ETTs were preferred over cuffed ETTs in neonates and children younger than 8 years.4 Narrowing of the airway at the subglottis can create an effective anatomic seal for ventilation without the need for a cuff.
- Advantages of uncuffed ETTs include:
- Less variability in the functional outer diameter (OD) of ETT due to differences in cuff shape, size, inflation requirements, etc. Generally, it is possible to place a ½ size larger uncuffed ETT than a cuffed ETT.
- Larger internal diameter (ID) than cuffed ETTs, which results in less airway resistance in a spontaneously breathing child.
- Smaller sizes are available. A 2.5 or 3.0 uncuffed ETT may be more appropriate for premature neonates.
Cuffed ETTs
- Multiple balloon sizes and shapes are available.
- Advantages of cuffed ETTs include:
- decreased number of intubation attempts needed to determine the appropriate size;
- decreased risk of aspiration;
- decreased risk of ETT migration;
- decreased operating room pollution;
- improved ability to control airway pressures and ventilation; and
- improved accuracy of capnography.
- The Microcuff ETT is specifically designed for use in children.4
- It has a high-volume, low-pressure, elliptical-shaped balloon that is more distally placed. A shortened cuff and the absence of a Murphy’s eye allow a more distal position of the cuff.
- Ultra-thin polyurethane cuff allows tracheal sealing with less pressure and complete surface contact with minimal cuff folds.
- Uninflated, the cuff only adds a minimal amount to the OD of the ETT.
- The manufacturer does not recommend its use in children less than 3 kg.
Which to Choose?
- Cuffed ETTs are generally preferred in the operating room for the advantages stated above.
- Cuffed ETTs are equally safe as uncuffed ETTs, and multiple studies have shown no differences in postoperative complications.
- A prospective randomized multicenter trial across 24 centers in Europe comparing postoperative complications between children intubated with cuffed vs uncuffed ETTs showed no difference in postoperative stridor between the two groups. However, 15 times as many children needed their ETT size changed in the uncuffed group, which resulted in more laryngoscopy attempts, which can cause mucosal swelling.9
Endotracheal Tubes: Size & Depth
ETT Size
- ETT size is based on the ID. The OD varies among manufacturers.
- Ensuring an adequately sized ETT is crucial. An ETT that is too small results in a large leak with decreased tidal volumes. On the other hand, an ETT that is too large exerts excess pressure against the tracheal mucosa, which leads to ischemic injury, edema, and risk for postextubation croup.
- Always have an ETT ½ size smaller and larger than expected available due to variability in pediatric airway size (Table 2).
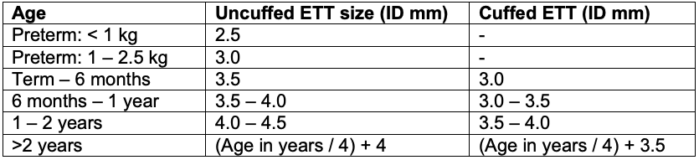
Table 2. Age and weight based ETT size guide. Adapted from Fiadjoe JE, et al. Pediatric airway. In: Cote CJ, Lerman J, Anderson BJ. Eds. A Practice of Anesthesia for Infants and Children. 6th edition. Philadelphia; 2019: 297-339
Leak Test
- After an ETT is inserted, a sustained inflation pressure of 20-25cm H2O should be administered to detect an audible or auscultated leak over the glottis.4 This pressure approximates the capillary pressure of the tracheal mucosa.
• If the pressure exerted by the ETT on the tracheal wall exceeds this, ischemic injury may occur. If no audible air leak is appreciated, the ETT should be exchanged for one that is ½ size smaller.
ETT Depth
- The tip of the ETT should ideally be located at the midpoint between the carina and thoracic inlet.4 The appropriate ETT depth can be calculated with formulas, using ETT markers or anatomic markers.
- Formulas based on age or weight4
- 10 cm for a newborn, 11 cm for a one-year-old, and 12 cm for a two-year old
- After 2 years of age:
o [Age (years) / 2] + 12
o [Weight (kg) / 5] + 12
o ID of ETT x 3
- ETT markers
- Uncuffed: place the double line on ETT at the glottic opening.
- Cuffed: place cuff just beyond vocal cords.
- Cuffed: palpate the cuff of the ETT at the suprasternal notch.
- Anatomic markers
- Helpful if the patient’s age or weight are unknown in emergency situations.
- Length of foot in cm: determines the depth for insertion of a nasotracheal tube.
- Nasal-tragal length (septum to tip of tragus) and sternal length (suprasternal notch to xiphoid process)
- Add 1 cm to the distance for the depth of an oral ETT.
- Add 2 cm to the distance for the depth of a nasal ETT.
- Measurements compare favorably with weight-based ETT depth formulas.
- Whatever technique is employed, auscultating for equal and bilateral breath sounds should be done to ensure appropriate position and ventilation. CO2 monitoring will confirm tracheal placement.
- Breath sounds should be appreciated at the axillae or lung apices rather than the anterior chest wall.4 In small children, endobronchial intubation may be masked when listening to the anterior chest wall because breath sounds can reverberate across the precordium.
- Some practitioners purposefully perform endobronchial intubation and auscultate one-sided breath sounds, and then withdraw the tube (about 2 cm) until bilateral breath sounds are heard. Unrecognized endobronchial intubation often results in unexpectedly high peak pressures and persistent mild desaturation.
References
- Doherty JS, Froom SR, Gildersleve CD. Pediatric laryngoscopes and intubation aids old and new. Paediatr Anaesth. 2009;19 Supple 1: 30-7. PubMed
- Matuszczak M, Gooden CK. Direct laryngoscopy equipment and techniques. In: Narasimhan J and Fiadjoe JE, Eds. Management of the Difficult Pediatric Airway. Cambridge UK; Cambridge University Press; 2020: 27-37.
- Collins SR. Direct and indirect laryngoscopy: Equipment and techniques. Respir Care 2014;59(6): 850-864. PubMed
- Fiadjoe JE, Litman RS, Serber JF, et al. Pediatric airway. In: Cote CJ, Lerman J, Anderson BJ. Eds. A Practice of Anesthesia for Infants and Children. 6th edition. Philadelphia; 2019: 297-339.
- Kalra A. Positioning infants and children for airway management. Pediatric Anesthesia Digital Handbook. Accessed Jan 27th, 2023. Link
- Takahata O, Kubota M, Mamiya K, et al. The efficacy of the "BURP" maneuver during a difficult laryngoscopy. Anesth Analg. 1997;84(2):419-21. PubMed
- Cormack RS, Lehane J. Difficult tracheal intubation in obstetrics. Anaesthesia. 1984;39(11):1105-11. PubMed
- Yentis SM, Lee DJH. Evaluation of an improved scoring system or the grading of direct laryngoscopy. Anaesthesia. 1998; 53:1041-44. PubMed
- Weiss M, Dullenkopf A, Fischer JE, et al. European Paediatric Endotracheal Intubation Study Group. Prospective randomized controlled multi-centre trial of cuffed or uncuffed endotracheal tubes in small children. Br J Anaesth. 2009;103(6):867-73. PubMed
Other References
Copyright Information

This work is licensed under a Creative Commons Attribution-NonCommercial-NoDerivatives 4.0 International License.