Key Points
- The flexible endoscope is considered the gold standard for intubating children with difficult airways, as it is one of the most versatile instruments.
- The first intubation attempt is the best attempt. Multiple tracheal intubation attempts have been shown to be a major risk factor for complications in the pediatric population.1 Optimize the first attempt to make it most successful.
- Combined techniques such as video laryngoscopy-assisted flexible endoscopic intubation and flexible endoscopic intubation through a supraglottic airway (SGA) take advantage of the best features of each device while minimizing the disadvantages.
Introduction
- The flexible endoscope is considered the gold standard for intubating children with difficult airways, as it is one of the most versatile instruments.
- Flexible endoscopes were previously referred to as fiberoptic scopes, as individual glass fiber cables were used to carry an image from the distal to the viewing end of the scope. Newer technology uses either a charge-coupled device or an integrated microchip (complementary metal oxide semiconductor) at the distal tip of the scope. Both technologies create a digital signal which is converted to an image on an external monitor. Current scopes are aptly referred to as flexible intubating endoscopes or flexible endoscopes.
Anatomy of the Intubating Endoscope
- The flexible endoscope has three main parts (Figure 1): the insertion cord, the handle, and the universal cord. The distal end of the insertion cord contains the camera or microchip and a light and is typically the narrowest portion of the cord. This end is inserted into the patient’s airway. The insertion cord also contains a working channel (1.2 to 1.5 mm) that passes along the length of the endoscope, except in the neonatal (2.2 mm) scope, which doesn’t have a working channel. The channel may be used to suction or to deliver medications, or fluid.
- The handle contains a lever that flexes or extends the distal end of the scope. In endoscopes with a working channel, the handle also contains the working channel port.
- The universal cord in current scopes connects to an external monitor that displays the digital image. In contrast, the universal cord in fiberoptic scopes connects to a light source and a camera that displays the image transmitted by the fiberoptic cables.


Figure 1. Flexible intubating endoscope
Intubating Endoscope Sizing
- Flexible endoscopes are measured by the outer diameter (OD) of the insertion cord, and pediatric scopes range from 2.2 mm to 4.9 mm OD. Many flexible endoscopes are larger than their nominal size, which is usually defined as the diameter of the tip.
- For a scope to fit into a tracheal tube, it needs to be a minimum of 0.3 to 0.5 mm smaller than the tracheal tube. This allows for advancing the tracheal tube without damaging the scope.
- The larger the gap between the scope and the tracheal tube, the more likely the tube will catch and hang up on tissue (e.g., epiglottis and arytenoids).
Techniques
Movements of the Intubating Endoscope
- The scope can only be manipulated in three directions:
- Flexion/extension of the distal tip
- Moving the lever up extends the tip. Moving the lever down flexes the tip.
- Most scopes will deflect up/down between 120° to 180°.
- Handle rotation
- Clockwise/counterclockwise rotation of the wrist
- For the movement in the handle to translate to the tip, the insertion cord must be held straight.
- Insertion cord advanced/withdrawn longitudinally
- Flexion/extension of the distal tip
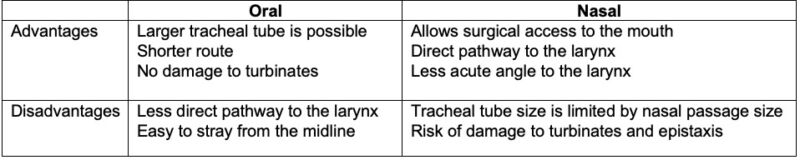
Table 1. Oral versus nasal flexible endoscopic intubation
Endoscope Grip
- The operator can hold the handle with either their nondominant or dominant hand. A benefit of holding the handle with one’s nondominant hand is that it allows for the dominant hand to have fine control of the distal end of the scope.
Endoscope Maneuvering
- As the endoscope is inserted into the airway, there are two main steps to take with every movement:
- place the target in the center of the field of view;
- once centered, move towards the target.
- These two steps are repeated in very small movements until intubation is complete.
- Move the tip in whichever direction is required to keep the target in the center of the field of view. Usually, this requires movement of the scope in more than one direction at a time (e.g., angulation of the tip, rotation, longitudinal movement) to keep the target in view.
Tips for Success
- The first attempt is the best attempt. Several studies have shown that multiple tracheal intubation attempts are a major risk factor for respiratory adverse events and severe complications in the pediatric population.1,2 Prepare equipment, positioning, and staff to optimize the first attempt and to make it most successful.
- Lower the bed height to allow the scope to be held straight
- Gently rest a finger on the patient’s maxilla to help stabilize one’s hand
- Having a skilled assistant during flexible endoscopic intubation is necessary. As the scope approaches the base of the tongue, the assistant provides jaw thrust, lifting the mandible and tongue off the posterior oropharynx.
- Decrease the risk of epistaxis during nasal flexible endoscopic intubation with these techniques:
- prewarm the tracheal tube;
- administer a topical vasoconstrictor (e.g., oxymetazoline or phenylephrine nasal spray);
- maneuver the endoscope around the nasal turbinates.
- Decrease the chances of the tracheal tube hanging up at the glottis with these techniques:
- choose the largest scope to accommodate the tracheal tube to decrease the gap between the scope and tube that will catch on laryngeal structures;
- use a Parker flex-tip tracheal tube that has a flexible, curved, centered, and tapered distal tip (Figure 2). The tip lies close to the scope to reduce the gap between the tube and the scope. The tip is designed to flex and yield when advanced into contact with structures.
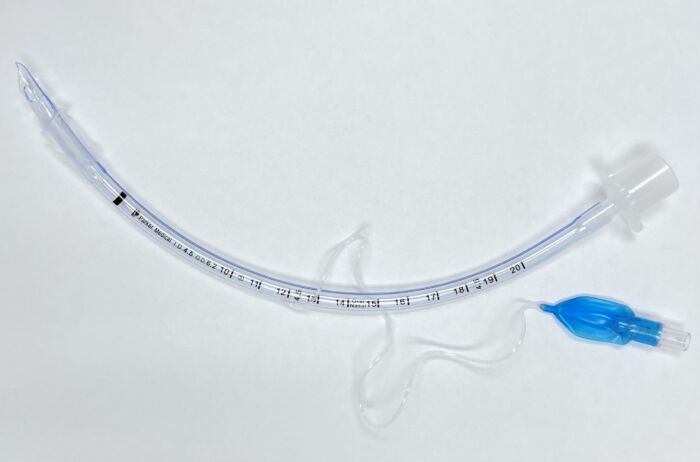
Figure 2. Parker flex-tip tracheal tube
-
- When the tracheal tube is advanced forward over the scope and is near the glottis, an assistant provides external laryngeal manipulation to optimize the angle of the glottic opening.
- Apneic oxygenation has been shown to increase apnea time during intubation in children, improving the safety of airway management in children.3 Apneic oxygenation should be considered for any pediatric patient with a suspected difficult airway. During flexible endoscopic intubation, oxygen can be delivered in the following ways:
- nasal cannula or humidified high-flow nasal oxygenation systems;
- modified nasopharyngeal airway (Figure 3);
- modified oral Ring-Adair-Elwyn tube (Figure 4a-b).4
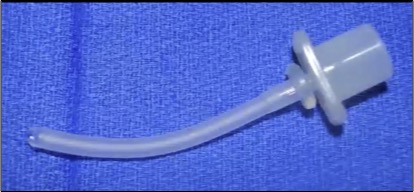
Figure 3. Modified nasopharyngeal airway
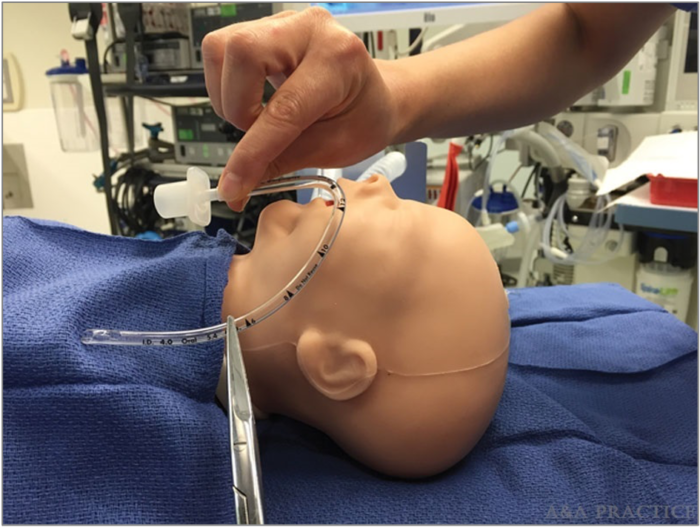

Figure 4a-b. Modified oral Ring-Adair-Elwyn tube to provide apneic oxygenation. Reproduced with permission from Man JY, Fiadjoe JE, Hsu G. Technique utilizing a modified oral Ring-Adair-Elwyn tube to provide continuous oxygen and sevoflurane delivery during nasotracheal intubation in an infant with a difficult airway. A A Pract 2018; 10(10):254-7.4
- In adult flexible endoscopic intubation, oxygen is often administered via the working channel port. This technique should be avoided in children, as there is little room for oxygen delivered subglottically to egress, increasing the risk of barotrauma or volutrauma.
Combined Techniques
Combined techniques simultaneously use two different devices for tracheal intubation. Combined techniques take advantage of the best features of each device while minimizing the disadvantages.
Video Laryngoscopy-Assisted Flexible Endoscopic Intubation
- Technique
- This technique requires another clinician familiar with both the video laryngoscope and flexible endoscope. The assistant will operate one of the devices (Figure 5a).
- Select the appropriate size video laryngoscope and flexible endoscope
- Preload the tracheal tube onto the endoscope
- Perform video laryngoscopy until the desired view is obtained
- Tilt the video laryngoscope blade slightly to the left of the midline to open a path for the flexible endoscope
- Advance the flexible endoscope into the airway, past the glottis, and into the trachea (Figure 5b)
- Advance the tracheal tube into the trachea under video laryngoscopic guidance
- Confirm the final tracheal tube position with the flexible endoscope
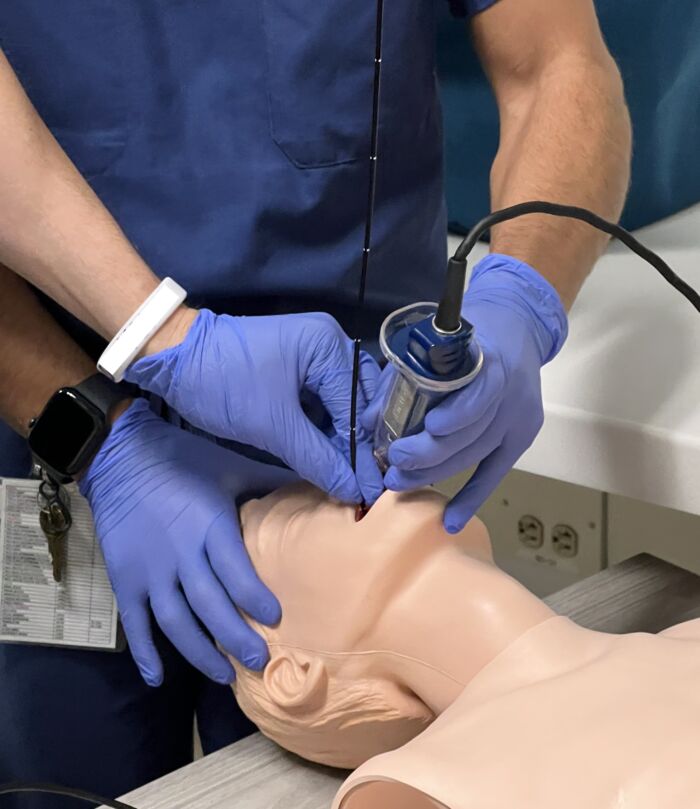
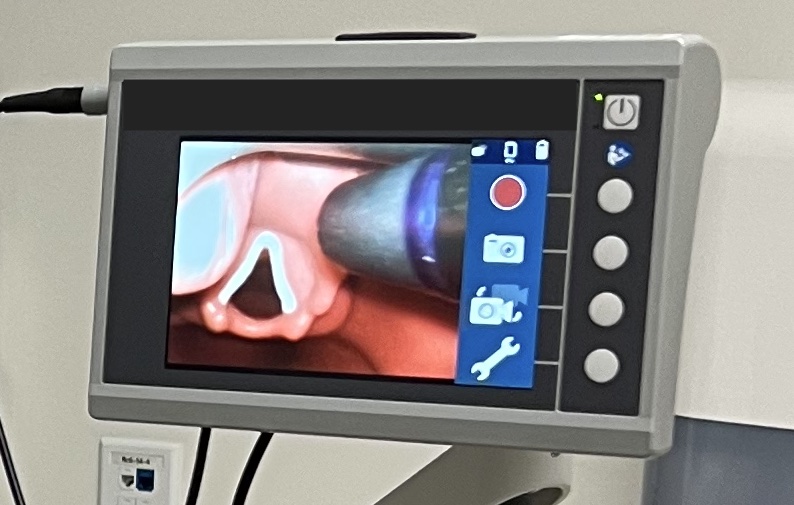
Figure 5a-b. Video laryngoscopy-assisted flexible endoscopic intubation
- Indications
- Rescuing a failed intubation from video laryngoscopy or flexible endoscopic intubation alone
- When the angle of intubation with video laryngoscopy is challenging, the flexible endoscope serves as a maneuverable stylet.
- Intubation of a patient with upper airway obstruction with a flexible endoscope; the video laryngoscope displaces soft tissue and maintains an oropharyngeal path.
- Advantages
- The video laryngoscope lifts oropharyngeal soft tissue in both nasal and oral flexible endoscopic intubation.
- The video laryngoscope provides a view of the tracheal tube at the glottis, allowing for visualization and treatment of tracheal tube hang-up.
Flexible Endoscopic Intubation Through an SGA
- Technique
- To maximize oxygenation and ventilation during flexible endoscopic intubation through an SGA, prepare the SGA and tracheal tube into one apparatus (Figure 6)
- Remove the 15mm circuit adapter from the SGA
- Partially insert a lubricated, cuffed tracheal tube into the shaft of the SGA; inflate the tracheal tube cuff to create a seal.
- Attach a bronchoscope swivel adapter to the proximal end of the tracheal tube
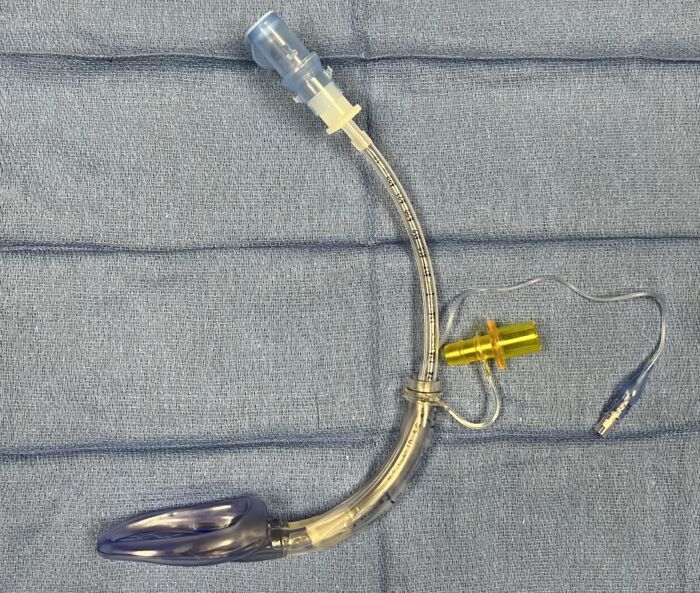
Figure 6. Pre-assembled SGA, inflated cuffed tracheal tube, and bronchoscope swivel adapter
-
- Insert the SGA into the patient’s mouth
- Attach the anesthesia circuit to the bronchoscope swivel adapter, allowing for oxygenation and ventilation throughout intubation
- Advance the flexible endoscope through the swivel adapter, tracheal tube, SGA, glottis, and trachea (in series) while oxygenation and ventilation are maintained
- Deflate the tracheal tube cuff
- Advance the tracheal tube over the flexible endoscope and into the trachea
- Confirm tracheal tube position with the flexible endoscope
- Remove the SGA with these steps:
- Separate the entire apparatus by removing the tracheal tube 15mm adapter from the tracheal tube
- Set the tracheal tube 15mm adapter (with the anesthesia circuit still attached) aside
- Insert a removal stylet (Figure 7) into the proximal end of the tracheal tube, stabilizing the tube
- Withdraw the SGA over the tracheal tube and stylet
- Grasp the tracheal tube at the level of the patient’s lips as the tube is visualized and the SGA is withdrawn
- Remove the stylet
- Reinsert the tracheal tube 15mm adapter and anesthesia circuit to the tracheal tube, reinitiating oxygenation and ventilation
- Confirm tracheal tube position with the flexible endoscope
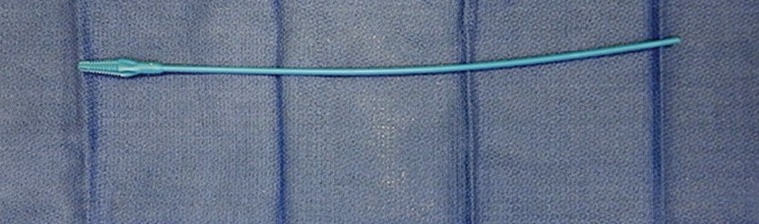
Figure 7. Removal stylet to stabilize tracheal tube during SGA removal
- Indications
- Intubation of a patient who has upper airway obstruction and low respiratory reserve
- Advantages
- Nearly continuous oxygenation and ventilation during tracheal intubation, except during the period of SGA removal
- Ability to deliver volatile anesthetic agents during tracheal intubation without contaminating the work environment
References
- Fiadjoe JE, Nishisaki A, Jagannathan N, et al. Airway management complications in children with difficult tracheal intubation from the Pediatric Difficult Intubation (PeDI) registry: a prospective cohort analysis. Lancet Respir Med. 2016; 4:37–48. PubMed
- Habre W, Disma N, Virag K, et al. Incidence of severe critical events in paediatric anaesthesia (APRICOT): a prospective multicentre observational study in 261 hospitals in Europe. Lancet Respir Med. 2017; 5:412–25. PubMed
- Riva T, Pedersen TH, Seiler S, et al. Transnasal humidified rapid insufflation ventilatory exchange for oxygenation of children during apnoea: a prospective randomised controlled trial. Br J Anaesth. 2018; 120(3):592–9. PubMed
- Man JY, Fiadjoe JE, Hsu G. Technique utilizing a modified oral Ring-Adair-Elwyn tube to provide continuous oxygen and sevoflurane delivery during nasotracheal intubation in an infant with a difficult airway. AA Pract. 2018; 10(10):254-7. PubMed
Other References
- Stricker PA, Kovatsis PG. Flexible bronchoscopy techniques: Nasal and oral approaches. In: Jagannathan N, Fiadjoe JE. Management of the Difficult Pediatric Airway. Cambridge, United Kingdom; Cambridge University Press; 2020:90-102.
- Olomu NP, Hsu G, Lockman JL. Hybrid approaches to the difficult pediatric airway. In: Jagannathan N, Fiadjoe JE. Management of the Difficult Pediatric Airway. Cambridge, United Kingdom; Cambridge University Press; 2020:118-28.
Copyright Information

This work is licensed under a Creative Commons Attribution-NonCommercial-NoDerivatives 4.0 International License.