Key Points
- Using an appropriately sized mask is critical for successful bag-mask ventilation (BMV) in children.
- Proper patient and provider hand positioning provide the best opportunity for successful bag-mask ventilation.
- If the provider is unable to ventilate through the patient’s natural airway, several devices can improve the success of BMV.
Introduction
- BMV is one of the most essential skills in airway management and thus one of the first skills taught in anesthesia training.
- BMV in the pediatric population can prove difficult given the variable sizes of patients and thus, varying equipment necessary for appropriate mask ventilation.
- Therefore, it is important to be familiar with the equipment and techniques that help increase the chances of successful BMV in children.
Choice of Mask and Bag
- Using an appropriately sized mask is critical for successful bag-mask ventilation (BMV) in children.
- Disposable, clear plastic masks with an inflatable cushioned rim are commonly used.1
- The ideal mask will cover the bridge of the nose to the mentum of the mandible, creating a seal around both the nose and mouth (Figure 1).

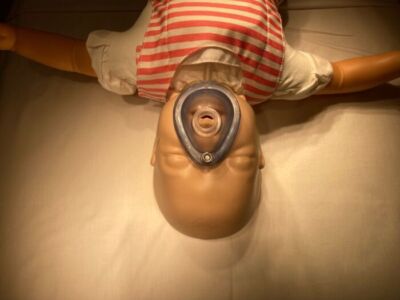
Figure 1. An appropriately sized face mask covering the bridge of the nose and the mentum of mandible.
- Proper inflation of the mask’s cushioned rim allows the mask to conform appropriately to the patient’s facial contours. If overinflated, a crease or change in skin contour will lead to a leak. If underinflated, the mask may fold on itself and create leaks between its folds.
- Two common types of bags used in BMV are self-inflating bags and flow-inflating bags.
- Self-inflating bags return to their rigid structure spontaneously after being squeezed and carry the advantage of not requiring fresh gas flow to perform mask ventilation. They do have the option of fresh gas supply if desired (Figure 2).
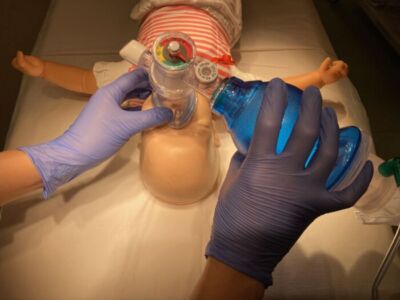
Figure 2. Self-inflating bag with incorporated adjustable positive end-expiratory pressure valve.
- Self-inflating bags also have a one-way valve that opens during inspiration and closes during expiration, which prevents rebreathing of exhaled gases and allows for ventilation with 100% oxygen.
- An adjustable valve can be added to a self-inflating bag to deliver positive end-expiratory pressure to the patient being ventilated.
- The disadvantage of the one-way valve in self-inflating bags is that it opens only when the bag is squeezed, thus eliminating the option of blow-by oxygen.
- Flow-inflating bags only inflate when receiving fresh gas flow and do not have the rigid structure nor the one-way valve of a self-inflating bag (Figure 3).

Figure 3. Flow-inflating bag with fresh gas flow inlet tubing attached. This bag also includes an adjustable positive end-expiratory pressure valve.
- Flow-inflating bags carry the advantage of being able to deliver blow-by oxygen, as well as more easily delivering continuous positive airway pressure (CPAP). It may also be easier for experienced providers to assess a patient’s lung compliance based on the amount of pressure required to ventilate the patient.
- Disadvantages of flow-inflating bags include their inability to function without fresh gas flow, as well as an increased amount of rebreathing with each breath.
Positioning and Technique
- The ideal patient position for BMV is supine with the head tilted and chin lifted to increase airway patency. A jaw thrust may also help with opening the airway. In infants and young children, a shoulder roll can be helpful since they have a large occiput that can partially occlude the airway when supine.
- To place the mask on the patient’s face, start by the placing the apex of the mask over the bridge of the nose and gently rest the base of the mask on the mentum of the mandible.
- For one-handed masking, place the thumb and index finger in c-formation over the top of the mask around the circuit port. The third and fourth digits should be used to lift the underside of the mandible to achieve the chin lift. If amenable, the fifth digit should be used to lift the angle of the mandible to achieve the jaw thrust (Figures 4a, 4b).
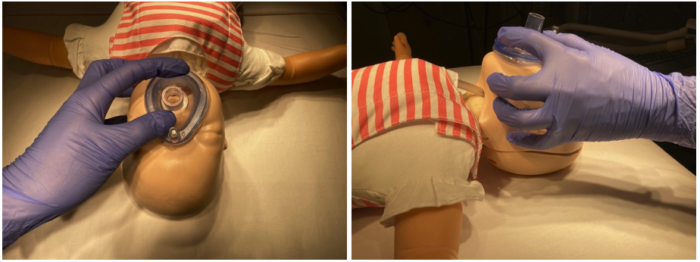
Figure 4a, 4b. Appropriate hand formation for one-handed masking technique.
- It is important to lift only the bony surfaces of the mandible and not the submandibular soft tissue to avoid potential physical compression of the airway. This is especially important in infants and young children.
- Clinicians should attempt to lift the patient’s face into the mask, as opposed to pressing the mask into the patient’s face, and also avoid completely closing the patient’s mouth.
- The goal is to maintain an adequate seal over the patient’s nose and mouth throughout mask ventilation. This may be more difficult in patients with obesity, facial hair (older teenagers), micrognathia, maxillary/mandibular hypoplasia, or craniofacial abnormalities.
- If maintaining a mask seal or achieving adequate positioning is difficult with one-handed ventilation, using two hands can often aid ventilation.
- For two-hand masking, place the thenar muscles along each side of the mask with the thumbs extending toward the base of the mask. Place the third and fourth digits behind the angle of the mandible and lift the patient’s mandible anteriorly and superiorly to achieve both head tilt and jaw thrust. A second provider should be asked to assist with squeezing the bag (Figure 5).
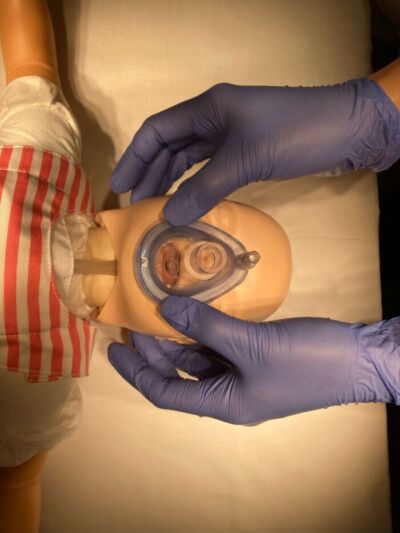
Figure 5. Appropriate hand formation for two-handed masking technique.
- BMV may still be difficult with a two-hand approach. See below for devices that can assist in adequate BMV before attempting definitive airway placement.
Assist Devices
- Several devices can improve the success of BMV if the provider is unable to ventilate through the patient’s natural airway.
- Often, oropharyngeal airways (OPAs) are the first device chosen to assist in stenting open a patient’s airway.
- An OPA is a rigid plastic device with a shape that mimics the curvature of a typical oropharynx and a central lumen that allows the passage of air from the opening of the mouth directly to the posterior oropharynx. The goal is to lift the tongue and soft tissue that may be obstructing ventilation (Figure 6).
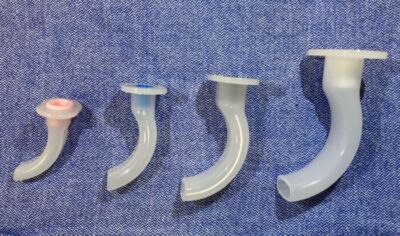
Figure 6. Assortment of oropharyngeal airways in escalating size.
- To estimate the appropriate sizing of an OPA prior to insertion, an OPA should be placed next to the patient’s cheek. An appropriately sized OPA will extend from the patient’s central maxillary incisors to the angle of the mandible (Figure 7).2
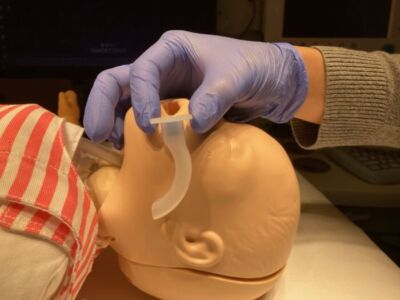
Figure 7. Technique for sizing an oropharyngeal airway, using the distance between the central maxillary incisors and the angle of the mandible as a guide.
- To insert an OPA, a tongue depressor should be used to push the tongue to the floor of the patient’s mouth, then the OPA should be slid along the curvature of the tongue until the outer opening is at the level of the patient’s incisors.
- If the OPA is too long, it may push the epiglottis into the glottic opening or cause trauma to the larynx. If the OPA is too short, it may exacerbate airway obstruction by kinking the base of the tongue.1
- Risks of OPA insertion include eliciting the gag reflex in a patient not fully anesthetized, as well as incorrect placement leading to continued inadequate ventilation. There is minimal risk for soft tissue damage or bleeding.
- Nasopharyngeal airways (NPAs) can be useful in patients with airway obstruction who are not fully anesthetized and have an intact gag reflex.
- NPAs are composed of malleable rubber or plastic, with a shape that loosely follows the curve of the nasopharynx and a central lumen that allows the passage of air from the nare to the posterior oropharynx (Figure 8). The goal of NPA insertion is the same as OPA insertion: to bypass the tongue and soft tissue that may be obstructing ventilation.
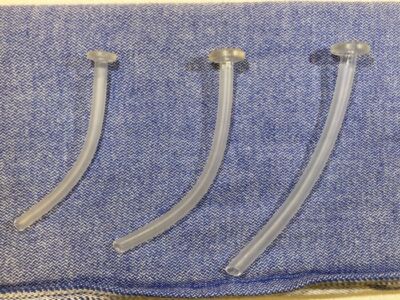
Figure 8. Assortment of nasopharyngeal airways in escalating size.
- NPAs carry the advantage of reducing the chance of eliciting the gag reflex and thus are often more comfortable for patients that are slightly more alert.
- To estimate the appropriate sizing of an NPA prior to insertion, place an NPA next to the patient’s cheek. An appropriately sized NPA will extend from the patient’s nare to the angle of the mandible (Figure 9).
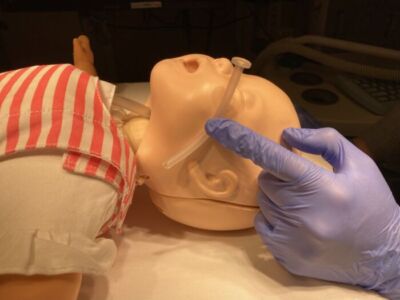
Figure 9. Technique for sizing a NPA, using the distance between the nare and the angle of the mandible as a guide. Please note this NPA is a bit long for this patient.
- To insert an NPA, the outside of the device should first be lubricated and a nare for insertion should be chosen. Gentle, constant posterior pressure should be applied through the nare until the outer opening is at the level of the nare. It is important to avoid getting lubricant inside the NPA, as this will occlude the lumen of the NPA.
- Risks of NPA insertion include an increased risk of bleeding, given the dense, superficial Kiesselbach’s plexus in the nasal turbinates. NPAs are also contraindicated in patients with basilar skull fractures, given the risk of further injury.
- If unable to ventilate despite multiple attempts, repositioning, and use of airway adjuncts, a rescue maneuver for ventilation is placing a supraglottic airway (SGA).
- SGAs are designed to create a seal around the patient’s glottic opening and are effective for bypassing any obstruction caused by soft tissue between the mouth opening and the larynx.
- SGA placement is a crucial step in the difficult airway algorithm and is discussed in a separate summary.
References
- Fiadjoe JE, Litmas RS, Serber JF, et al. The pediatric airway. In: Cote CJ, Lerman J, Anderson BJ. Eds. A Practice of Anesthesia for Infants and Children. 6th edition. Philadelphia; 2019: 297-339.
Other References
- Pediatric Manual (Bag-Mask) Ventilation. The Children’s Hospital of Philadelphia Interdisciplinary Pediatric Airway Skills Education Program. Accessed 1/10/2023. Link
Copyright Information

This work is licensed under a Creative Commons Attribution-NonCommercial-NoDerivatives 4.0 International License.