Key Points
- Central venous catheters (CVCs) are indicated for patients who require vasopressors, invasive monitoring, present with difficult vascular access, or require the administration of incompatible or high-risk medications.
- Proper catheter selection, aseptic technique, insertion using ultrasound guidance for jugular and femoral approaches, and site choice (internal jugular, subclavian, or femoral vein) ensure safe and effective CVC placement.
- Postplacement confirmation of catheter tip position and awareness of both procedural and postprocedural complications—such as pneumothorax, infection, thrombosis, and bleeding—are essential for patient safety.
Indications for Central Venous Cannulation1
- Common indications for central venous cannulation are listed below.
- Hemodynamic instability necessitating vasopressor and/or inotrope administration
- Requirement for invasive hemodynamic monitoring, including central venous pressure or central venous oxygen saturation
- Infusion of hyperosmolar agents or vesicants with the risk of phlebosclerosis (e.g., hypertonic saline, calcium chloride)
- Inadequate peripheral vascular access—either failure to obtain in urgent/emergent settings or insufficient for ongoing resuscitative efforts
- Initiation of high-flow extracorporeal therapies (e.g., hemodialysis, plasmapheresis, continuous renal replacement therapy)
- Need for concurrent infusions of incompatible agents, such as total parenteral nutrition, chemotherapy, vasoactive drugs, or caustic medications
- Anticipated or active massive transfusion in patients with limited peripheral access
- Access for interventional procedures: inferior vena cava filter placement, catheter-directed thrombolysis, or transvenous pacing
Choosing the Catheter, Site, and Method for Cannulation
Catheter Selection2
- The type of CVC chosen depends on the clinical indication and the anticipated duration of therapy requiring central venous access.
- CVCs can be divided into four major categories:
- Nontunneled CVC
- Tunneled CVC
- Implantable port
- Peripherally inserted central venous catheter
- This summary focuses on nontunneled CVCs, which are the ones most commonly placed by anesthesiologists and intensivists.
Catheter Site
- CVCs are most typically placed in the internal jugular, subclavian, and common femoral veins.
- The catheter site is based on the clinical scenario and the clinician’s preference.
- The internal jugular vein, particularly the right internal jugular vein, is most commonly selected due to its consistent anatomy, easy accessibility, low risk of complications, and the ease of using ultrasound guidance during the procedure.3
- The left internal jugular vein approach carries a higher risk of thoracic duct injury and typically requires a longer catheter length.3
- The subclavian vein offers low rates of infectious and thrombotic complications, patient comfort, and remains accessible in trauma patients with cervical collars. Its drawbacks include a higher risk of pneumothorax, a limited ultrasound window for line placement, and a noncompressible position behind the clavicle.4
- The femoral vein may be preferred in critically ill patients because it avoids interference from resuscitation equipment and allows easy compression.5
- It can be especially useful in trauma or coagulopathic patients.
- It carries a higher risk of thrombotic events and potentially increased rates of catheter-associated infections.
Cannulation
- Before initiating CVC insertion, clinicians should obtain informed consent (if possible).
- Gather all necessary equipment should be gathered, assess the optimal/ intended access site with ultrasound to verify patency and caliber, considering anatomy and procedural ease, position the patient appropriately (Trendelenburg for internal jugular/subclavian, supine or reverse Trendelenburg for femoral)
- Ensure vital sign monitoring, complete hand hygiene and don sterile personal protective equipment, establish a sterile field and prepare the site with chlorhexidine/isopropyl alcohol antiseptic, flush and prepare the catheter ports, drape the patient with the access site exposed, sheath the ultrasound probe and secure it to the drape, confirm all supplies are within reach, and conduct a procedural “time out”
- Cannulation under ultrasound guidance (Figure 1) should always be used when available for internal jugular and femoral vein placements.3
- Identify the vein (easily compressible) that will be cannulated, and its depth as well as the adjacent artery, and verify that the transducer is properly oriented
- Anesthetize the skin and subcutaneous tissues if the patient is awake
- Advance the needle with syringe at approximately a 45-degree angle, entering the skin the same distance from the probe as the vessel depth, while maintaining negative pressure and continuous visualization of the needle tip on ultrasound until dark venous blood is aspirated
- After aspirating venous blood, the clinician should stabilize the needle, disconnect the syringe, and advance the guidewire smoothly through the needle. If resistance occurs, the clinician should reassess for vessel entry or distal obstruction and reattempt threading. If the wire enters the heart and causes ectopy, it should be withdrawn slightly until the arrhythmia resolves.
- Once the guidewire reaches 15-20 cm, it should be stabilized securely with at least two fingertips while withdrawing the needle over the wire. The wire placement should then be confirmed in the target vein within the vessel lumen using ultrasound in both transverse and longitudinal planes. If the wire is not clearly visualized intraluminally, do not proceed; instead, remove the wire, apply pressure, and either reattempt access at the same site or choose a different anatomic location.
- Once the guidewire is confirmed within the vessel lumen, preload the dilator onto the wire and advance it to within 2–3 cm of the skin, then make a small 0.5 cm skin incision to a depth of half the blade, remove the scalpel, and advance the dilator over the wire through the incision and without advancing the guidewire.
- Holding the dilator at its midpoint, apply gentle, steady pressure—with slight twisting—to dilate the soft tissue, inserting approximately one-third to one-half of its length, depending on the site and catheter type, noting that larger catheters like dialysis lines may require multiple dilation stages with enlargement of the initial skin incision.
- After removing the dilator from over the guidewire, hold pressure over the skin entry site to reduce bleeding (without ever releasing control of the guidewire), then thread the central venous catheter over the wire while slightly withdrawing the wire from the skin to maintain control while advancing the catheter. If it is a large-bore introducer, the dilator and catheter are integrated, and the cannulation is completed by simply removing the dilator.
- The guidewire should be removed through the distal once the catheter is fully inserted.
- Blood and air should be aspirated from all lumens, and each port of the central venous catheter should be flushed with sterile solution. Luer locks or caps are ideally placed before flushing the ports.
- Secure the catheter with two sutures, place a bio-patch at the hub-skin junction, apply a sterile occlusive dressing, dispose of waste appropriately, return the patient to a comfortable position, and confirm proper catheter placement depth and lack of pneumothorax after the operation if it is placed in an operating room or after the procedure if it is placed outside the operating room.

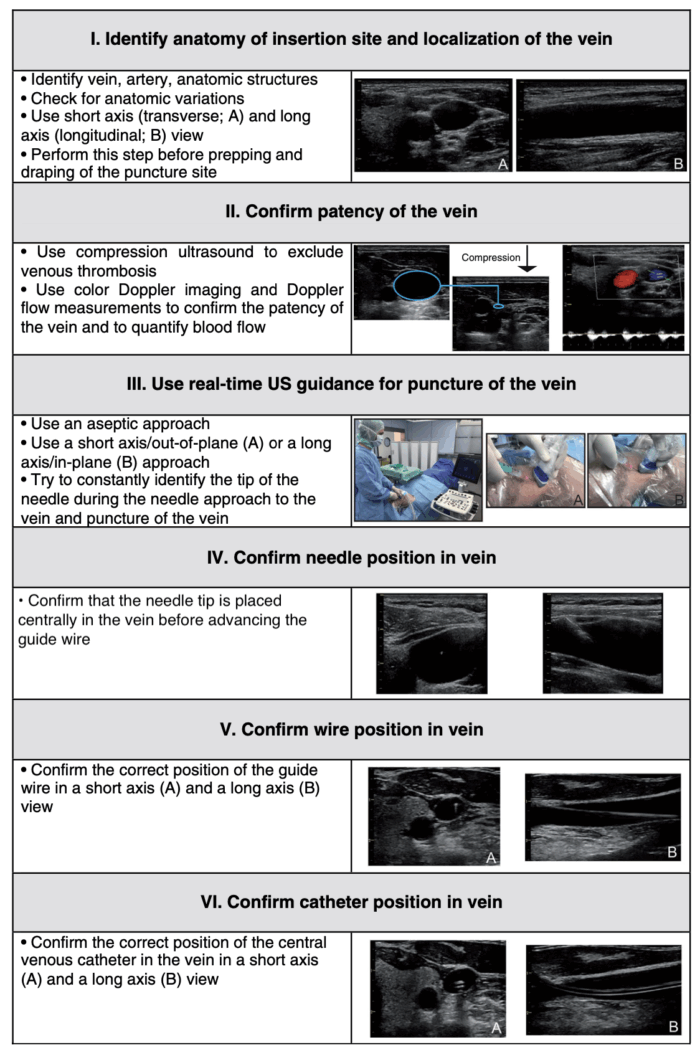
Figure 1. Six-step approach to ultrasound-guided central venous catheter placement. Source: Saugel B, et al. Ultrasound-guided central venous catheter placement: a structured review and recommendations for clinical practice. Critical care (London, England). 2017.3 CC BY 4.0.
Confirming the Position of Catheter Tip6,7
- It is crucial to confirm the proper placement of the CVC after cannulation.
- Chest radiography is considered the standard of care for assessing CVC tip position and ruling out complications, such as pneumothorax, malposition, and kinking.
- Numerous guidelines recommend positioning the tip outside the pericardial sac to reduce the risk of cardiac tamponade in case of a catheter-caused vascular perforation.
- The takeoff of the right mainstem bronchus is above the pericardial reflection and serves as a useful landmark for the maximum depth of the catheter tip position (Figure 2).8
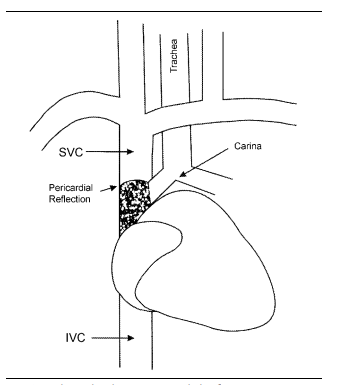
Figure 2. Relationship between pericardial reflection, superior vena cava, carina, and mainstem bronchi. Used with permission from Caruso LJ, et al. A better landmark for positioning a central venous catheter. J Clin Monit. 2002.8
- In left-sided CVC, the tip enters the superior vena cava (SVC) at a more oblique angle as it passes through the left brachiocephalic vein.
- This angled entry increases the risk of vascular perforation during catheter insertion, and then due to the catheter tip’s orientation against the wall of the SVC.
- Other methods of confirming proper venous line placement include transducing the vessel by manometry or even blood gas measurement.
Complications of CVC Placement
Various complications can arise both during the placement of a central venous catheter and from its presence while it remains in place.
Procedural Complications9
- Air embolism can occur during venous puncture if the patient is not head-down or breathing spontaneously or via the catheter or catheter track during catheter removal.
- Tracheal injury
- Hematoma formation leading to bleeding, which may obstruct the airway
- Pleural puncture/pneumothorax
- Arterial puncture/hematoma/stroke
- Arrhythmias or bundle branch blocks can be caused by guidewire irritation of the atria or ventricles.
Postprocedural Complications9
- Central line-associated bloodstream infection Link
- Central venous narrowing (stenosis)
- Development of a thrombus (blood clot) around or near the catheter
- Bleeding may occur later, especially in coagulopathic patients or after repeated insertion attempts.
References
- Rupp SM, Apfelbaum JL, Blitt C, et al. Practice guidelines for central venous access: a report by the American Society of Anesthesiologists task force on central venous access. Anesthesiology. 2012;116(3), 539–73. PubMed
- O'Grady NP, Alexander M, Burns LA, et al. & Healthcare Infection Control Practices Advisory Committee (HICPAC) (2011). Guidelines for the prevention of intravascular catheter-related infections. Clinical infectious disease: an official publication of the Infectious Diseases Society of America, 52(9), e162–e193. PubMed
- Saugel B, Scheeren TWL, Teboul JL. Ultrasound-guided central venous catheter placement: a structured review and recommendations for clinical practice. Critical care (London, England). 2017; 21(1), 225. PubMed
- Parienti JJ, Mongardon N, Mégarbane B, et al. Intravascular complications of central venous catheterization by insertion site. N Engl J Med. 2015; 373(13):1220–29. PubMed
- Nasr-Esfahani M, Kolahdouzan M, Mousavi SA. Inserting central venous catheter in emergency conditions in coagulopathic patients in comparison to noncoagulopathic patients. J Res Med Sci.. 2016; 21: 120. PubMed
- Stonelake PA, Bodenham AR. The carina as a radiological landmark for central venous catheter tip position. Br J Anaesth. 2006;96(3): 335–340. PubMed
- Venugopal AN, Koshy RC, Koshy SM. (2013). Role of chest X-ray in citing central venous catheter tip: A few case reports with a brief review of the literature. J Anaesthesiol Clin Pharmacol. 2013; 29(3): 397–400. PubMed
- Caruso LJ, Gravenstein N, Layon AJ, et al. A better landmark for positioning a central venous catheter. J Clin Monit. 2002; 17(6): 331–4. PubMed
- Kinsella SM, Tuckey JP. Perioperative bradycardia and asystole: relationship to vasovagal syncope and the Bezold-Jarisch reflex. Br J Anaesth. 2001;86(6): 859–68. PubMed
Copyright Information

This work is licensed under a Creative Commons Attribution-NonCommercial-NoDerivatives 4.0 International License.